| Project |
| MultiGeneBlast |
| Download |
| Documentation |
| Installation |
| Tutorial |
| FAQ |
| Contact |
Tutorial
- Introduction
- Overview: input, databases and output
- Preparing your input file
- Using an existing EMBL or GenBank file on your system If you want to perform a homology search with a genomic region that is contained by a nucleotide EMBL or GenBank file on your system, no preparation is needed, as long as this file contains both the DNA sequence of the region and the annotations of CDS features (coding regions). If either the DNA sequence or CDS annotations are missing from the file, you can use one of the alternative modes to acquire a suitable version of your file, as stated below.
- Downloading a GenBank entry of your choice
- Generating an EMBL file from unannotated sequence data and an annotation table (Expert Users) If you have your own sequence data and gene annotations, which have not been annotated in GenBank or EMBL format yet, a Python script (format_embl.py) has been provided to generate an EMBL file from a nucleotide FASTA file containing your genome sequence or contig and one TXT file containing the positions and annotations of its genes. The script is located in the format_embl folder.
- Preparing a multiple-entry FASTA file for an architecture search
- Preparing your search databases
- Downloading the general MultiGeneBlast GenBank database For convenience, a MultiGeneBlast database containing all amino acid sequences from GenBank is available for download. This can be downloaded simply by clicking Download MGB Genbank database in the Download menu. Naturally, using this database has the advantage of enabling an exhaustive search of the entire available sequence space, yet it has the disadvantage that running it takes a long time and needs quite a lot of system memory.
- Creating a search database from local EMBL / GenBank files
- Creating a search database from GenBank entries on the NCBI server
- Creating a search database from a subset of GenBank divisions
- Setting up your MultiGeneBlast run
- Reading and interpreting the output
- Using MultiGeneBlast from the command line (Expert users)
Many biochemical pathways and systems in nature, especially in prokaryotes and fungi, are encoded by genes that are located physically close to each other on the chromosome, in operons or gene clusters. MultiGeneBlast combines Basic Local Alignment Search Tool (BLAST) searches of multiple predicted proteins and maps their hits onto their parent nucleotide scaffolds. This can either be used to find operons or gene clusters homologous to a known operon or gene cluster (with the homology search mode), or to find novel genomic loci which contain a certain user-specified combination of genes (with the architecture search mode). MultiGeneBlast can either be run using a graphical user interface or from the command-line. The first sections of this tutorial will explain how to use the tool using the graphical user interface. A final section will explain how to use it from the command-line.

The input of a homology search consists of canonical GenBank or EMBL nucleotide entry files along with either start and end coordinates of the query region or a list of genes (locus tags or accession numbers) from the entry that will make up the search query. For an architecture search, the input consists of a FASTA file containing multiple amino acid sequence entries. When setting up a search, an input file can be loaded by selecting Open input file in the File menu. The database which is searched by MultiGeneBlast is a special version of a normal NCBI Blast+ protein database, also containing files (*.cords.tar, *.pinfo.tar, *_all_descrs.txt) that contain information on the parent nucleotide entry of each protein and the location of its gene on this nucleotide entry. A database can be loaded by clicking Select database in the File menu. The next paragraphs will explain how to obtain input files for your search, as well as how to obtain a suitable search database.

If the genomic region of your choice is located in a nucleotide entry in the GenBank database (as, for example, is the case for most if not all published genome sequences), you can search for the entry by clicking Download GenBank entry from the Download menu. If then, for example, you want to search for homologues of the menaquinone operon from Bacillus subtilis, which has been cloned and sequenced, you can enter menaquinone as a keyword and Bacillus subtilis as the organism of origin, and a number of matches will appear in the search window. After selecting the entry of your choice (which, in this case, may equally well be the complete B. subtilis genome sequence), you can download it by clicking the Download button.
The script can be used as follows:
1. Prepare a tab-delimited TXT file annotationtable.txt containing a table with the information on each exon / gene structured in the following columns: 1) name of contig FASTA file or genome sequence, 2) gene locus tag (must be unique), 3) 5 exon or gene start, 4) 3 exon or gene end, 5) gene annotation.
2. Copy annotationtable.txt and the FASTA files of the contig or genome sequence into format_embl folder.
3. In the command line, type python format_embl.py. For this command to work, you will have to have Python installed on your computer. If you use a Windows system, you will also need to add the Python installation directory to your PATH environment variable.
4. If the script finishes successfully, input an EMBL file for your genome sequence or contig will have been created, which you can use as input for MultiGeneBlast.
Examples for the TXT and FASTA files are provided with the MultiGeneBlast download and are located in the format_embl directory.
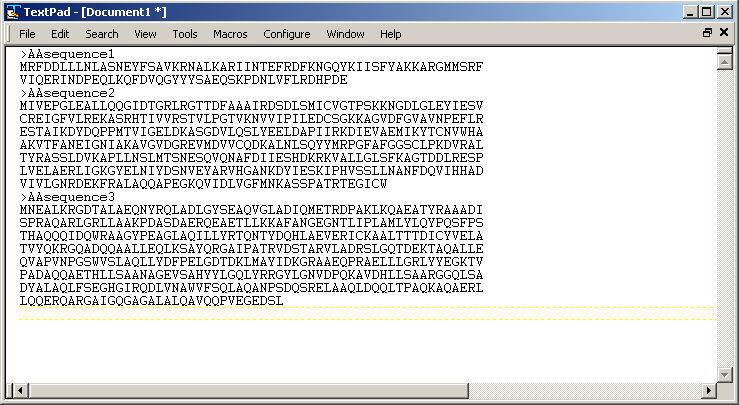
A multiple-entry FASTA file to be used as input for an architecture search can easily be made in any text editor, such as Notepad (Windows), TextPad (Windows), Notepad++ (Windows), TextEdit (Mac OS X), Aquamacs (Mac OS X), Kate (Linux) or gedit (Linux). Every FASTA entry should start with a line containing the ">" sign, followed by the description On the line or lines below that, you can then paste the amino acid sequence of your gene of interest. Protein sequences can easily be found by searching them on the NCBI Protein portal and then clicking the FASTA link below the entry description. When you finished creating your FASTA input file, you save it as file type "All Files (*.*)" with the extension .fasta. Hence, your file name should be called something like yourfastafile.fasta.
Several options are available for downloading or creating MultiGeneBlast databases. First of all, a MultiGeneBlast database with all entries from GenBank is available for download using the gui or from this website. Secondly, you can create a MultiGeneBlast database from local files on your computer. Thirdly, you can design a database from multiple GenBank entries by searching for them on the NCBI server, after which MultiGeneBlast downloads them and creates a database. Finally, a database can be created by specifying a subset of GenBank divisions, after which MultiGeneBlast connects to the NCBI FTP server, downloads these divisions and constructs a MultiGeneBlast database out of them.

If you have your own sequence data in which you want to search for certain operons or gene clusters, you can easily make a database out of your own sequence files. To do so, click Create database from files in the Database menu. In the window that then appears, you can click the Add files button to select files to add to your selection. Once you are satisfied with your selection, click the Make database button to create your database. If you want to use the tblastn algorithm directly on raw nucleotide sequences in your data instead of using the blastp algorithm to search for homology in annotated genes, you can tick the tick box at the bottom: Make raw nucleotide database for tblastn-searching. This will also allow you to add raw nucleotide FASTA sequences. The same option is also available in the other database construction windows.

Often, the GenBank entries from which you would like to design your database will not be present locally on your computer. When clicking Create database from online GenBank entries in the Database menu, a window will appear in which you can search GenBank entries and move the ones you are interested in to a selection that is displayed at the bottom of the window. You can keep on searching and adding entries until you are satisfied with your selection, after which you can click the Download and create database button to make MultiGeneBlast connect to the NCBI server, download the entries and compile them into a database.

In some cases, the pre-constructed GenBank MultiGeneBlast database may not entirely fit your needs, while you do want to search within a relatively global search space. For example, if you work on bacteria, you may have little interest in finding distant homologies with plant genomes. Hence, MultiGeneBlast allows you to create databases from specific subsets of GenBank divisions. When clicking Create database from GenBank subdivisions, a selection window will appear in which you can select those divisions you are interested in. After clicking Make database, MultiGeneBlast will connect to the GenBank directory on the NCBI FTP server, download the corresponding files and create a database.
When you have created or downloaded your database and have prepared your input file, you are ready to start a search. As a start, you have to select what search type you want to perform by clicking the corresponding radio button. Then, you can load the input file and database by using the corresponding options in the File menu.
If you are setting up a homology search, this is the time when you select which region from your input file will constitute your search query. You can select the region of choice either using the scale bars for the nucleotide start position and nucleotide end position, or using the gene selection widget below that. When using genomic positions to specify your query region, you can look these up by inspecting the GenBank entry of your input online or by opening the input file in a text editor. Take care to precisely pinpoint the start and end positions, so that your search will be specific and will not consume unnecessary computational resources. When you know the gene names or locus tags covering your intended query region, it is often easier to select your query region by clicking the Select genes button. This will open up a window in which you can select the genes of your choice. Holding the shift key while selecting allows you to select a whole array of genes at once, and holding the control key allows you to combine multiple selections. Using the gene selection to specify your search query has the advantage that you can skip genes that are located in the middle of an operon or gene cluster but that are of less interest.
Finally, after entering a name for the output directory in which the results will be stored (within the MultiGeneBlast installation folder), you can change the default of a number of search parameters:
- Number of CPU cores to be used: you can change the number of processor cores of your system that you want to devote to the MultiGeneBlast job. If you still want to use the computer for other things during the run, it is recommended to leave at least one processor free.
- Number of Blast hits per gene to be mapped: you can specify the maximum number of Blast hits per gene that will be mapped to its parent genomic regions. In most cases, 250 is enough. However, if you want to be absolutely certain that your search is exhaustive, you can select 500 or 1000. On the other hand, if you are only interested in the closest homologues, 50 may suffice, reducing the computation time of your run in the process.
- Weight of synteny conservation in hit sorting: factor that determines the weight that synteny conservation has in the sorting of hit gene clusters. A score of 0.5 gives 0.5 points to each pair of adjacent genes with conserved synteny, while the presence of homologues of the genes themselves leads to 1 point per gene.
- Minimal sequence coverage of BLAST hits: with this option, you can specify a threshold for the minimum percentage of the query gene that is involved in a Blast hit for a Blast hit to be taken into account in the analysis.
- Minimal % identity of BLAST hits: with this option, you can specify a threshold for the minimum percentage identity of a BLAST hit for it to be taken into account in the analysis.
- Maximum distance between genes in locus: this allows you to specify how far apart genes with a Blast hit are allowed to be to be counted as a single genomic locus in the results. Set this to a low value if you are looking for tightly transcriptionally coupled operons or set it to a high value if you are looking for general genomic regions.
- Number of hit loci to display: this determines the maximum number of output pages (50 hits per page).
- Muscle alignment of homologs with queries: when this box is ticked, Muscle alignments of each query gene with all detected homologs will be generated. This can be a good reference to see the similarity between genes at the sequence level, and can easily be loaded into a tool such as MEGA to generate a phylogenetic tree.

When you are done setting up your run, click Run MultiGeneBlast to start the search. A window will appear that will regularly update you on the current status of the search process.
When the search has finished, a browser window will open with a visualization of the search results, with a sorted overview of the genomic regions that match best to your query. If no browser window appears, you can also manually open the file displaypage1.xhtml in the results folder (within the MultiGeneBlast directory) with your browser.

For every hit, the output will display the total MultiGeneBlast score (composed of the number of BLAST hits matching the tresholds set and the number of contiguous gene pairs with conserved synteny) as well as the cumulative BLAST bit score. The colors of the gene arrows represent Blast homology. If multiple query genes are homologous to each other, they are grouped together with their hit genes into a single homology group with the same color. The white gene arrows represent (surrounding) genes without Blast hits to the query.
When clicking a gene, a panel will pop up that gives the annotation of the gene, its location and the details of any Blast hits on it by the query genes. Also, a link is given that opens a new browser tab to input this gene as a query in the search form for a single gene BlastP search from the NCBI server.

To have a closer look at the similarities between the query gene cluster and a hit gene cluster, the selection box at the top can be used. When a gene cluster is selected, a zoomed in SVG of the query gene cluster together with this gene cluster is displayed in the browser window. To go back to the overall search results, click the Display all button on the right. To navigate between results pages with more results, the links at the top of the output window can be used.
Using MultiGeneBlast from the command line follows all the same principles that were outlined above. The MultiGeneBlast executable (multigeneblast.exe on Windows or multigeneblast on Linux and Mac OS X) within the MultiGeneBlast directory is used to perform the searches. The executable must always be executed from the MultiGeneBlast directory itself. A list of the search parameters (as explained above) and an explanation of how to use them can easily be obtained by typing multigeneblast -h in the command prompt or terminal from within the MultiGeneBlast directory. Databases can be created from local files using makedb.exe or makedb, and from GenBank divisions using makegbdb.exe or makegbdb. If you want to run the executables from another folder than the installation directory, you will have to add the installation directory to your $PATH environment variable. For those who wish to use MultiGeneBlast as a step within a larger pipeline, the TXT output clusterblast_output.txt in the results directory can be used for easy parsing.